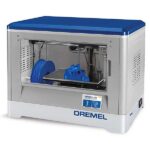
Dremel Digilab 3D20 Printer Review
by Review3dPrinters November 9, 2022
Share this

Want a good quality mid-range price 3d printer? Check this detailed review about Dremel Digilab 3D20 and how to use it.
The tool brands are now branching off into the 3d printers market. It is one of the many options available for anyone deciding to get into 3d printing. It’s easy to install and use, and is ideal for dentists to create dental pieces, architects, or interior designers to create models of their projects, among many other uses.
However, before we dive into the printing details, let’s look at the tech specs.

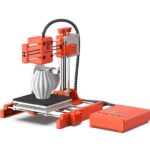
Dremel Digilab 3D20 3D Printer
- Build Volume: 9.0 inches x 5.9 inches x 5.5 in inches
- Nozzle size: 0.01 inches
- Filament Type: PLA
- Build Plate Material: Acrylic
- Connectivity: SD Card and USB
- Extruder Type: Single
- Bed Leveling: 3 screws / manually
- Screen: Full-touch color screen
- Layer Thickness: 100 microns
- Power Requirements: 120 V, 60 Hz, 1.2 amp
Design & Features

The Dremel Digilab 3D20 3D Printer is a sturdy piece that needs no assembling as it comes already built. It includes an SD Card that can install the 3d printer software into the laptop or desktop.
As a plus, it contains ten designs to start printing right away.
It comes with a sheet to help calibrate the base each time you will create a 3d print.
The base is acrylic, and two sheets protect it; this way, the acrylic base won’t melt when the machine is printing.
The needle is to clean before printing and two PLA filament, and unlike ABS, which is an industrial type of filament, this one is bio-degradable and is safer to use at home.
When you turn on the machine, the bottom screen will show you two options.
The loading process is simple and easy-to-read. Among the functions available are: filament, calibrate, home, among others. It’s a very intuitive ideal for people with little experience; even a supervised kid could use it.
The filament is inside the base, and it has a manual lock to secure the filament roll into place.
Place the base with the protective cover with the two dents facing the inner interior wall of the 3d printer, then push down the safety lock.
The software included is just printing software; it won’t let you create any model.
It would help if you created said models on different programs like Autocad, for example, which you then save to an STL extension; this way, you can scale it in the 3d printer software.
When you save the file, it will ask you the quality you want to keep: high, medium, or low.
Choosing low quality makes printing fast. It uses little material, but the final product will have a porous texture, and selecting the high quality will use much more material to take up to three times to finish. Still, the final product will be very detailed and smooth.
Before printing, the software will let you know how much material and the estimated time it will take to finish the job.
The machine can work between 15 minutes and 24 hours; it all depends on the complexity of the design.
It can work with other PLA filaments as long as the diameter is the same (3/4″), but it better to use the same brand, especially if you are within the warranty time.
There are two ways to start 3d printing; one is saving the scaled design directly on your SD card and inserting it into the machine’s side slot. It avoids the use of cables. Or you can use the included USB cable in the set.
The 3d printer will show you the models on the screen to choose from, and once selected, it has two buttons; stop and pause. The pause button allows you to change the filament roll if you run out or change colors.

The extruder comes installed and heats the filament at 397°F.
Before printing, the base must be leveled, in the control panel, choose the tools options > level.
The leveling is a three-step process, with three screws, two in the front and one in the back, the control panel will guide you in the entire process, leveling is critical to avoid waste of material as it will dry too fast.
After lifting the base, try to fit the paper piece between the bottom and the extruder, if it does not pass, you must unscrew until it does, you want to feel slight pressure, repeat this process for all three screws.
The next step is placing the filament inside the extruder; for this in the control panel, select the filament option > load.
Introduce the filament in the tube first; this way, the filament has a secure place, and it won’t get stuck when the machine is working.
Touch the load option and wait for the extruder to heat up to 397°F to melt the filament.
When it is ready, place the filament, and the extruder will start to pull it, and when you see a thin plastic thread coming down, the extruder is ready, and you can press the finish button.
With the needle’s help, remove the PLA melted thread, and the machine will start printing your object.
Once it’s finished, open the door, press down the base to release, and remove it. Please wait a while until it cools off, you can also paint the printed pieces.
The maintenance is simple compared to 3d resins as it’s not as messy.
Packing & Assembly
The Dremel Digilab 3D20 does not require much assembly outside securing the print bed and leveling the base. You can start printing within minutes of unpacking.
Here’s everything included in the box:
- Dremel Digulab 3D20
- Quick start guide
- PLA filament (1x .5kg spool)
- USB cable
- SD card loaded with model files and Dremel3D software
- Build tape
- Removal tool
- Instruction manual
- Unclog tool
- Leveling sheet

Customer Support
Dremel offers a one-year warranty to cover the Dremel Digilab 3D20 after it’s purchased. Other benefits included:
- Free cloud-based slicing software
- 1-year warranty
- World-class customer support
- UL safety certification to allow you to print overnight without anxiety
Technical support can be reached over the phone or through email, but be sure to specify which printer the inquiry is about.
Their technical supports are very helpful and tend to respond fast.
There are also plenty of videos posted across several social media outlets where other Dremel Digilab 3D20 users publish their positive experiences.
My Final Verdict
Considering that the average price for this 3d printer is 600 US dollars through Amazon and includes a 1-years warranty and customer support, it is a good deal.
Would I suggest this printer?
Yes, but not to everyone, I think this is an excellent option, but for those who can afford a mid-range 3d printer, if you are new to this world or are buying it for your kids, I would suggest something cheaper. It is still a great 3d printer option.
When you buy through links on this site, I may earn a small commission at no cost to you. Thanks.
Last update on 2023 / Affiliate links / Images from Dremel